
So … You’ve Just Got A Beer Making Kit!
Beer making kits are a popular gift. One that can either kindle a home brewing passion that flourishes or quite the opposite, a one time event. In most cases this will be determined by the finished product, whether the beer is any good or not.
You may have been given one as a present over Christmas or for a birthday, or maybe just decided to buy one for yourself to give home brewing a try. Beer kits are a great way to start home brewing and probably the most accessible. You can go from knowing nothing about making beer to drinking one of your own home brews in a little over a week.
The only trouble is, if you don’t know very much about brewing then you only have the instructions that came with the kit. The instructions are fine, but they are usually pretty brief, one or two sides of A4.
Having a little more knowledge of the more important parts of making beer will ensure you get the best results from your first beer kit rather than possibly a subpar beer that turns you off brewing all together.
In this article we’ll have a look at making a great beer kit and help you know what to focus on. Things that may only be briefly mentioned in your beer kit instructions.
Table of Contents
Beer Kit Basics
I know it’s exciting and you probably just want to dive straight into making beer. The most important thing to get right though is making sure all your equipment is clean and sanitised.
Cleaning and Sanitising
If you have got brand new fermenting vessels, spoons and funnels they will look clean, so you may be eager to jump right in and get started. I cannot emphasise enough however that they need to be sanitised first.
Everything that comes into contact with the beer needs to be clean so wipe everything down with a cloth, make sure there is no dust or packaging left on the surface of your equipment. Once everything is clean we need to sanitise.
Your beer making kit may have sanitiser included, if so then follow the instructions and make sure that you treat all the equipment that you are going to use.
If your beer kit doesn’t have any sanitising solution with it, you’ll need to get some. There are a number of options available and I have listed them here in this article about cleaning and sanitising. Perhaps the easiest to get hold of though is regular unscented bleach.
You’ll be able to pick up thin, unscented bleach (sodium hypochlorite) at any supermarket and it’s really inexpensive, You’ll need to make sure it’s unscented so it won’t interfere with the beer even after rinsing. Make up a sanitising solution in the following way:
- Take your fermenting vessel and fill with water
- Add one tablespoon of bleach (15ml) per 4 litres / gallon. If your fermenter is 25 litres / 6 gallons you’ll need roughly 6 tablespoons or 95ml of bleach.
- Add all your brewing gear that needs sanitising (anything that will contact the beer).
- Let everything sit for a few minutes and it’ll be completely sanitised.
- Empty out the sanitising solution and thoroughly rinse two or three times.
That’s all there is to it. This is a simple way to ensure your brewing gear is ready to use. There are other methods of sanitising and I have covered them in this article so check them out.
Temperature
Temperature is important in beer making and it often gets overlooked. The skill of the brewer is to create an ideal environment for yeast to turn a sweet, malty liquid (wort) into beer.
Yeast is a living organism so it’s important the conditions you set up for it enable it to thrive and grow without any stress. One of the more important of these conditions is the temperature. Your beer kit instructions will probably suggest a temperature range to ferment the beer at and following these instructions is important.
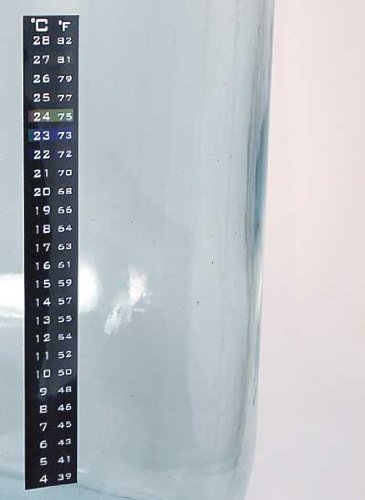
If you are making an ale, a good temperature to keep the beer in whilst it’s fermenting is between 18 – 21°C (65 – 70°F). Lager is fermented at lower temperature between 7 – 13°C (45 – 55°F).
If the fermentation is too warm, the yeast can create unwanted flavours in the beer. These flavour compounds are called esters and fusels. These can range in flavour from banana up to solvent-like chemical tastes. Fusels have also been linked to hangovers although it’s still debated.
Yeast create heat when they are fermenting the beer. The reactions they perform are exothermic. This means that the temperature in the fermenter will be a couple of degrees warmer than ambient. This can be taken into account when you choose a spot for the beer to ferment in.
To cold and the beer won’t ferment properly at all. The yeast need some warmth to work properly. Too cold and they will drop out of the beer and begin to hibernate.
Keeping the fermenter at a constant temperature range if possible avoids these unpleasant side effects. If you maintain the optimal temperature for the yeast it really does go a long way to producing a much better beer. It’s one of the more important things to get right and can be the difference between a poor result or a great one.
Go Easy On The Sugar
Beer kits are usually formulated to a certain ABV (alcohol by volume). It can be tempting for the new brewer to increase this by adding lots of sugar to boost this up.
Generally this isn’t a good idea. If your beer kit suggests you use sugar then use the amount and type specified, here is why.
Regular white sugar doesn’t add any flavour. Adding something to the beer kit that doesn’t contribute flavour and only boosts the alcoholic content will in most cases make it taste worse, not better.
Sugar does have a place in home brewing but using it in this heavy handed fashion will always make the beer thin, dry and usually not particularly nice. Follow the instructions with the beer kit and you will end up with better results.
If you do want to add extra fermentables to increase the ABV or instead of using sugar then malt extract is a good way to do it. Malt extract comes in both dry and liquid form and it’s made using the same ingredients as the beer kit itself.
As an example if a beer kit suggests using 1kg of sugar then substitute in 500g of malt extract as well as 500g of sugar. This will lead to a much more rounded and flavourful beer.
There is also a product available called beer enhancer made especially for beer kits that require sugar. It is a blend of sugar and malt extract just like the example above.
Get To Grips With Fermentation
Fermentation creates a lot of carbon dioxide, you will notice this when your airlock is furiously bubbling away. It’s exciting to think that making beer creates that much activity.
Soon the airlock will begin to slow and eventually the bubbling will stop. Before you bottle the beer you need to make sure fermentation is complete and you’ve waited the number of days the instructions state. Just because the airlock is not bubbling doesn’t mean the yeast have finished working.
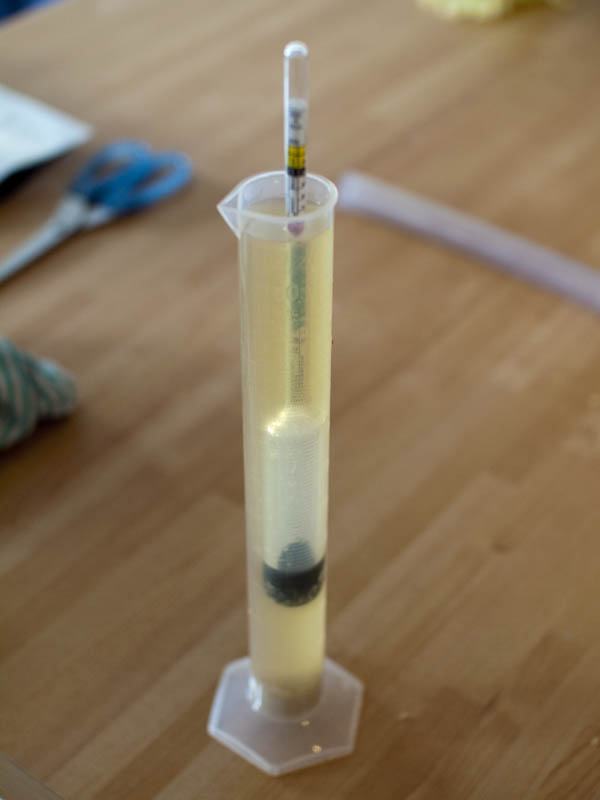
The way to ensure fermentation is complete is by taking a hydrometer reading. Hopefully your beer kit came with a hydrometer.
If it did you can take readings on consecutive days by taking a sample of the beer. Make sure you sanitise your equipment that comes into contact with the beer. Draw off a sample and drop the hydrometer in, noting the reading (specific gravity). If the readings are the same on consecutive days then you’ll know fermentation is complete.
If you have no hydrometer and no way of getting one, wait for the amount of time specified in the instructions. Ensure there is no airlock activity and sample the beer again sanitising your equipment such as syphon. Taste the sample and make sure it’s not too sweet, if fermentation is complete there should not be too much sweetness.
If the beer is overly sweet wait some more and try again a few days later, ensuring the beer isn’t too cold. Eventually the beer will finish and be ready to bottle.
I really do recommend buying and using a hydrometer if you don’t have one. You can read more about using a hydrometer here. The problem with bottling before fermentation is complete is the beer may overcarbonate in the bottle. This leads to problems when you open the bottle and all the beer gushes out or even worse the bottles bursting. A hydrometer will make sure that doesn’t happen.
Have Patience
This is a biggie. Brewing a beer, especially your first beer kit is exciting. Brewing is not a hobby to be rushed though. We live in a time where almost everything we want we can get instantly but brewing is one thing that requires time.
Rushing through fermentation and not waiting as you have just read can lead to problems. The beer also needs time to condition in the bottles. The beer won’t be at its best for at least three weeks at a minimum after bottling. This is where patience comes in.
I know how exciting it can be and how much anticipation builds when you are waiting for beer to be ready and I’ve been doing it for a long while. It really is worth waiting for though.
Have Fun!
Although I have just spouted off a load of words about what you should do and shouldn’t do, ultimately making beer should be fun. I know if you have read this far you probably care about making your beer kit the best it can be.
Only a few simple things to remember and you can create a great home brew. Although it may be your first beer kit it could be the start of a life long passion.
Recommended Reading:
I have listed a few articles below that may be of use to you as you progress through your beer kit making journey. Have a good one!


Leave a Reply
Want to join the discussion?Feel free to contribute!